Stitching React and Rails together
05 Dec 2024

In this tutorial, I will take you through my current process of deploying a Rails 8 app with some careful design choices:
- React: Best design engineering stack for those itching to add some front end flair. React is also very LLM-friendly since it’s trained on vast amounts of WWW data, making it a popular choice for building front end using text prompts. I replaced the ‘V’ in the ‘MVC’ using the inertia-on-rails library to use React instead of Hotwire (I was earlier skeptical about going the React route, and was learning Hotwire initially for the frontend. This podcast by Vercel’s former lead design engineer, Mariana Castilho convinced me otherwise)
- shadcn/ui: Beautifully designed components that you could copy and paste into your app). React and shadcn/ui are a match made in heaven.
- Hetzner VPS: The cheapest VPS server which one could avail for. The costs are as low as 4$/month.
- Kamal 2: Deployment tool that comes as a Rails 8 default with zero-downtime deploys, rolling restarts, asset bridging, remote builds, accessory service management. Serves as a good Heroku alternative.
- SQLite3: Rails 8 now supports using SQLite for caching, queuing, and WebSockets, reducing dependence on additional services like Redis. You can also now use SQLite for production making it convenient for indie developers.
Rails Inertia Integration
Let’s see how to start a new Rails application with Inertia.js using the inertia_rails-contrib generators. For this step, I’m following the instructions by Evil Martians. First, we’ll set up a new Rails application, skipping the default JavaScript and asset pipeline setup:
rails new [app-name] --skip-js --skip-asset-pipeline

cd [app-name]
Next, we’ll install the inertia_rails-contrib gem and run the installation generator:
bundle add inertia_rails-contrib

bin/rails generate inertia:install
The generator will install the Vite frontend build tool, optionally installing Tailwind CSS, and asking you to choose a frontend framework; we’ll select React.
$ bin/rails generate inertia:install
Installing Inertia's Rails adapter
Could not find a package.json file to install Inertia to.

Would you like to install Vite Ruby? (y/n) y
         run  bundle add vite_rails from "."
Vite Rails gem successfully installed
         run  bundle exec vite install from "."
Vite Rails successfully installed

Would you like to install Tailwind CSS? (y/n) y
Installing Tailwind CSS
         run  npm add tailwindcss postcss autoprefixer @tailwindcss/forms @tailwindcss/typography @tailwindcss/container-queries --silent from "."
      create  tailwind.config.js
      create  postcss.config.js
      create  app/frontend/entrypoints/application.css
Adding Tailwind CSS to the application layout
      insert  app/views/layouts/application.html.erb
Adding Inertia's Rails adapter initializer
      create  config/initializers/inertia_rails.rb
Installing Inertia npm packages

What framework do you want to use with Inertia? [react, vue, svelte] (react)
         run  npm add @inertiajs/react react react-dom @vitejs/plugin-react --silent from "."
Adding Vite plugin for react
      insert  vite.config.ts
     prepend  vite.config.ts
Copying inertia.js entrypoint
      create  app/frontend/entrypoints/inertia.js
Adding inertia.js script tag to the application layout
      insert  app/views/layouts/application.html.erb
Adding Vite React Refresh tag to the application layout
      insert  app/views/layouts/application.html.erb
        gsub  app/views/layouts/application.html.erb
Copying example Inertia controller
      create  app/controllers/inertia_example_controller.rb
Adding a route for the example Inertia controller
       route  get 'inertia-example', to: 'inertia_example#index'
Copying page assets
      create  app/frontend/pages/InertiaExample.jsx
      create  app/frontend/pages/InertiaExample.module.css
      create  app/frontend/assets/react.svg
      create  app/frontend/assets/inertia.svg
      create  app/frontend/assets/vite_ruby.svg
Copying bin/dev
      create  bin/dev
Inertia's Rails adapter successfully installed
That’s it! The installation generator has set up the Inertia.js Rails adapter, installed the necessary NPM packages, installed and configured Vite and Tailwind CSS, and created an example page. At this point, you can start the Rails server by running bin/dev and navigate to http://localhost:3100/inertia-example. You should see the Inertia.js page with the React component.
Why use shadcn-ui?
Unlike UI component libraries, we are not installing shadcn-ui as a package and importing components from it, i.e., this is NOT how shadcn/ui works:
import { Button } from "shadcn-ui";Instead, the components’ source code is being generated by the CLI and added to the project. They become part of the project source code.
your-project
├── components
│   ├── ui
│   │   ├── button.tsx
│   │   └── card.tsx
│   ├── your-folder
│   │   └── your-component.tsx
│   └── your-another-component.tsx
└── lib
    └── utils.ts
Project structure
And then the components can be used by importing them from local files as if they are developed by you.
import { Button } from "@/components/ui/button";At this point, shadcn/ui’s mission is effectively completed. The generated code is now part of your source code. This approach is quite special and has its advantages and disadvantages.
Advantages
You have full control over the generated code and have the ability to apply any customizations you see fit. If you are planning to implement your design system, doing so with shacdcn/ui as the base line is very easy. For example, for the Button component,
export const buttonVariants = cva(
  'inline-flex items-center justify-center whitespace-nowrap rounded-md text-sm font-medium ring-offset-background transition-colors focus-visible:outline-none focus-visible:ring-2 focus-visible:ring-ring focus-visible:ring-offset-2 disabled:pointer-events-none disabled:opacity-50',
  {
    variants: {
      variant: {
        default: 'bg-primary text-primary-foreground hover:bg-primary/90',
        destructive:
          'bg-destructive text-destructive-foreground hover:bg-destructive/90',
        outline:
          'border border-input bg-background hover:bg-accent hover:text-accent-foreground',
        secondary:
          'bg-secondary text-secondary-foreground hover:bg-secondary/80',
        ghost: 'hover:bg-accent hover:text-accent-foreground',
        link: 'text-primary underline-offset-4 hover:underline',
      },
      size: {
        default: 'h-10 px-4 py-2',
        sm: 'h-9 rounded-md px-3',
        lg: 'h-11 rounded-md px-8',
        icon: 'h-10 w-10',
      },
    },
    defaultVariants: {
      variant: 'default',
      size: 'default',
    },
  },
);

export interface ButtonProps
  extends React.ButtonHTMLAttributes<HTMLButtonElement>,
    VariantProps<typeof buttonVariants> {
  asChild?: boolean;
}

export const Button = forwardRef<HTMLButtonElement, ButtonProps>(
  ({ className, variant, size, asChild = false, ...props }, ref) => {
    const Comp = asChild ? Slot : 'button';
    return (
      <Comp
        className={cn(buttonVariants({ variant, size, className }))}
        ref={ref}
        {...props}
      />
    );
  },
);
Button.displayName = 'Button';
All we need to do is to customize the Tailwind CSS classes in variants to customize the button without touching the rest of the code.
Integrating shadcn/ui with Rails/InertiaJS
Now that we’ve installed react on a rails app using Inertia JS, it’s a good segue to install the shadcn library to our app. To make shadcn/ui run with our customised Rails 8 app, I updated the following files as follows:
{
  "files": [],
  "references": [
    {
      "path": "./tsconfig.app.json"
    },
    {
      "path": "./tsconfig.node.json"
    }
  ],
  "compilerOptions": {
    /* Fixes https://github.com/shadcn-ui/ui/issues/3411 */
    "baseUrl": ".",
    "paths": {
      "@/*": [
        "./app/frontend/*"
      ]
    }
  }
}
tsconfig.json
I also add a components.json to the root location that provides the relevant installation requirements for shadcn/ui:
{
  "$schema": "https://ui.shadcn.com/schema.json",
  "style": "default",
  "rsc": false,
  "tsx": true,
  "tailwind": {
    "config": "tailwind.config.js",
    "css": "app/frontend/entrypoints/application.css",
    "baseColor": "stone",
    "cssVariables": true,
    "prefix": ""
  },
  "aliases": {
    "components": "@/components",
    "utils": "@/lib/utils"
  }
}
component.json
After this step, add a utils.ts under app/frontend/lib/utils.ts as follows:
import { type ClassValue, clsx } from "clsx"
import { twMerge } from "tailwind-merge"
export function cn(...inputs: ClassValue[]) {
return twMerge(clsx(inputs))
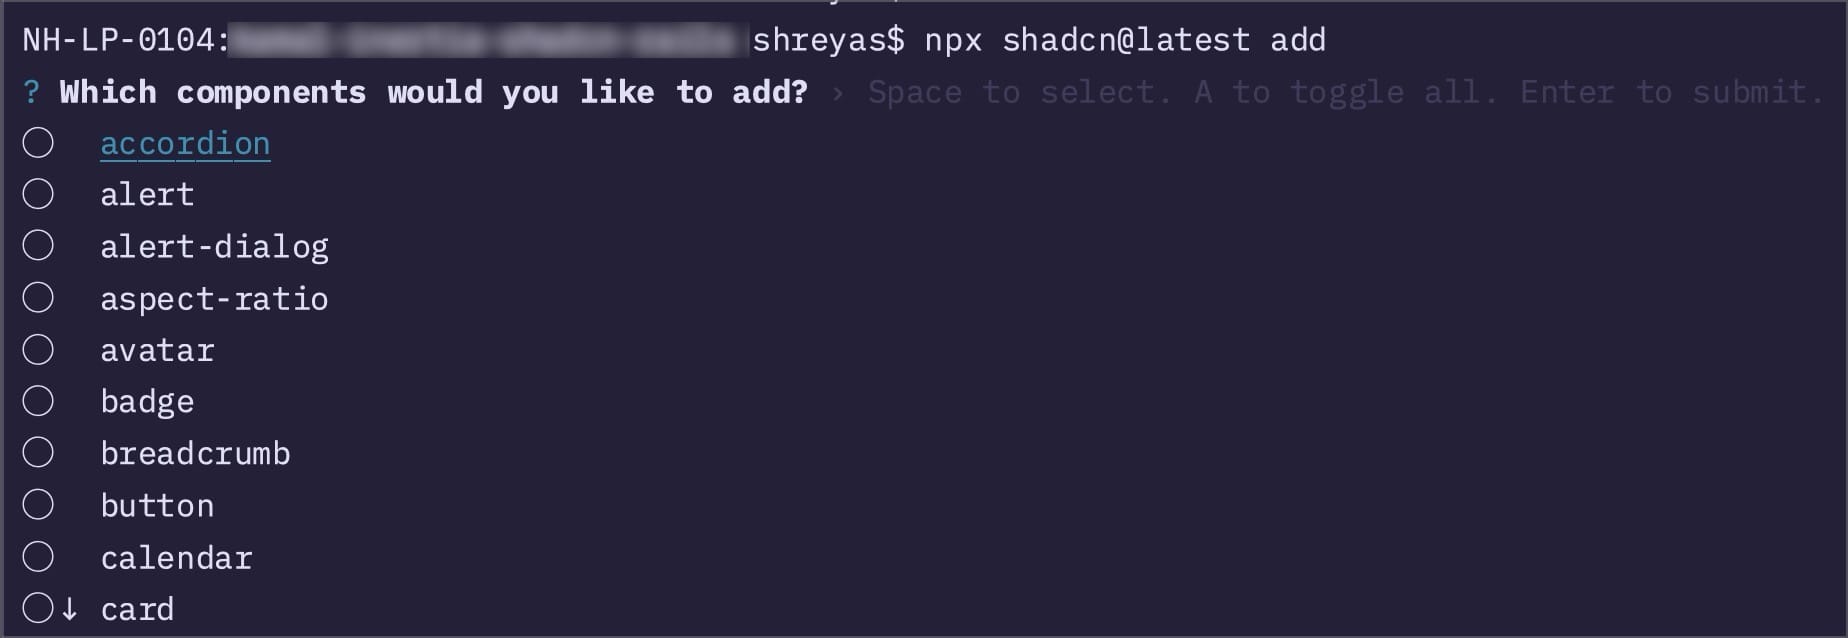
}This completes the integration of shadcn into this project. You can test out the npx commands on the terminal to see if the integration has worked. Running npx shadcn@latest add will provide a UI to select any of the components you would like to install:
You can also create any custom frontend interface using v0.dev using prompts. In the below example, I just prompt v0.dev to provide me the interface for a modern podcast player (one shot prompt):
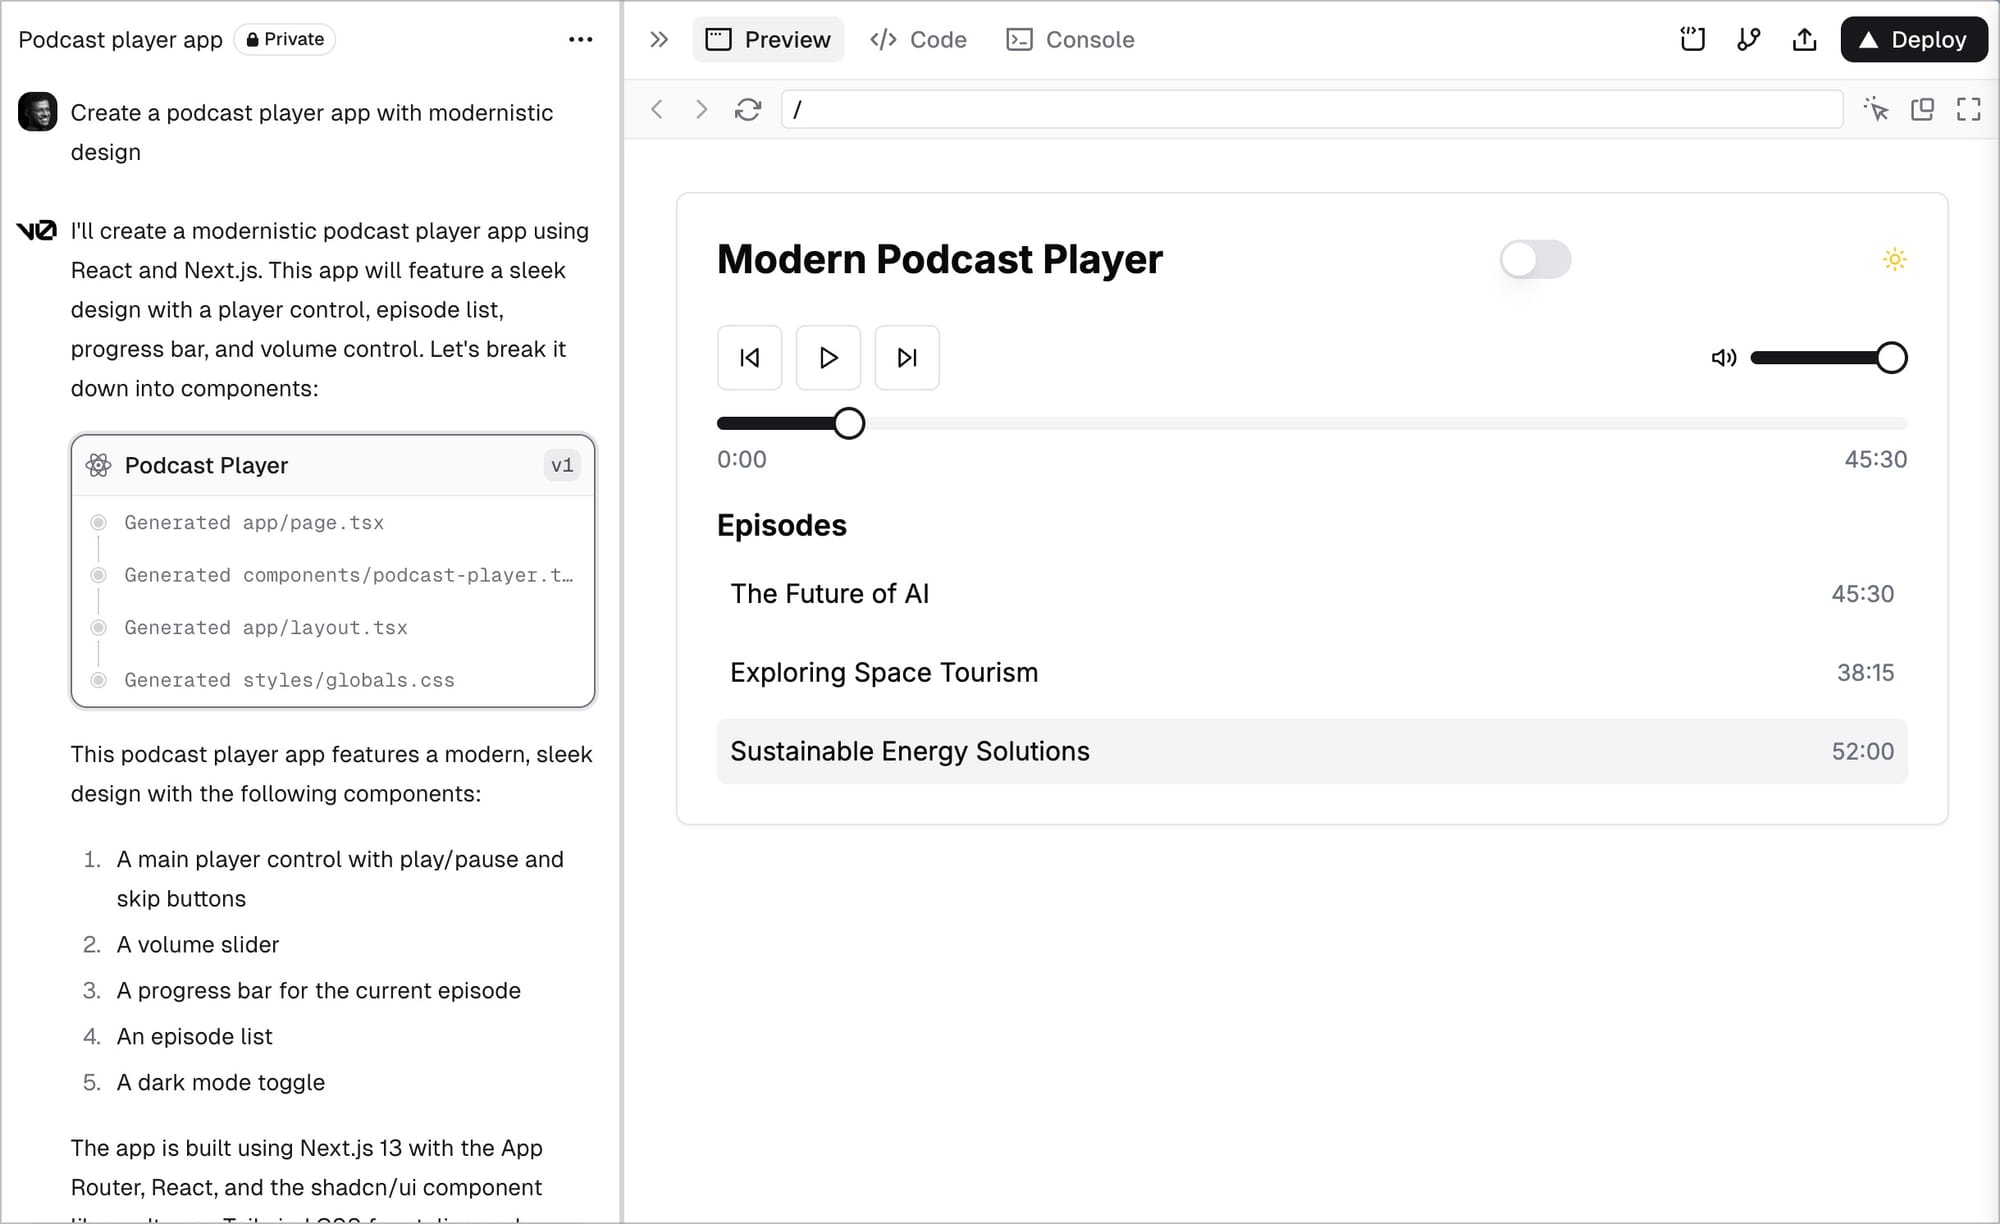
v0.dev generates the UI
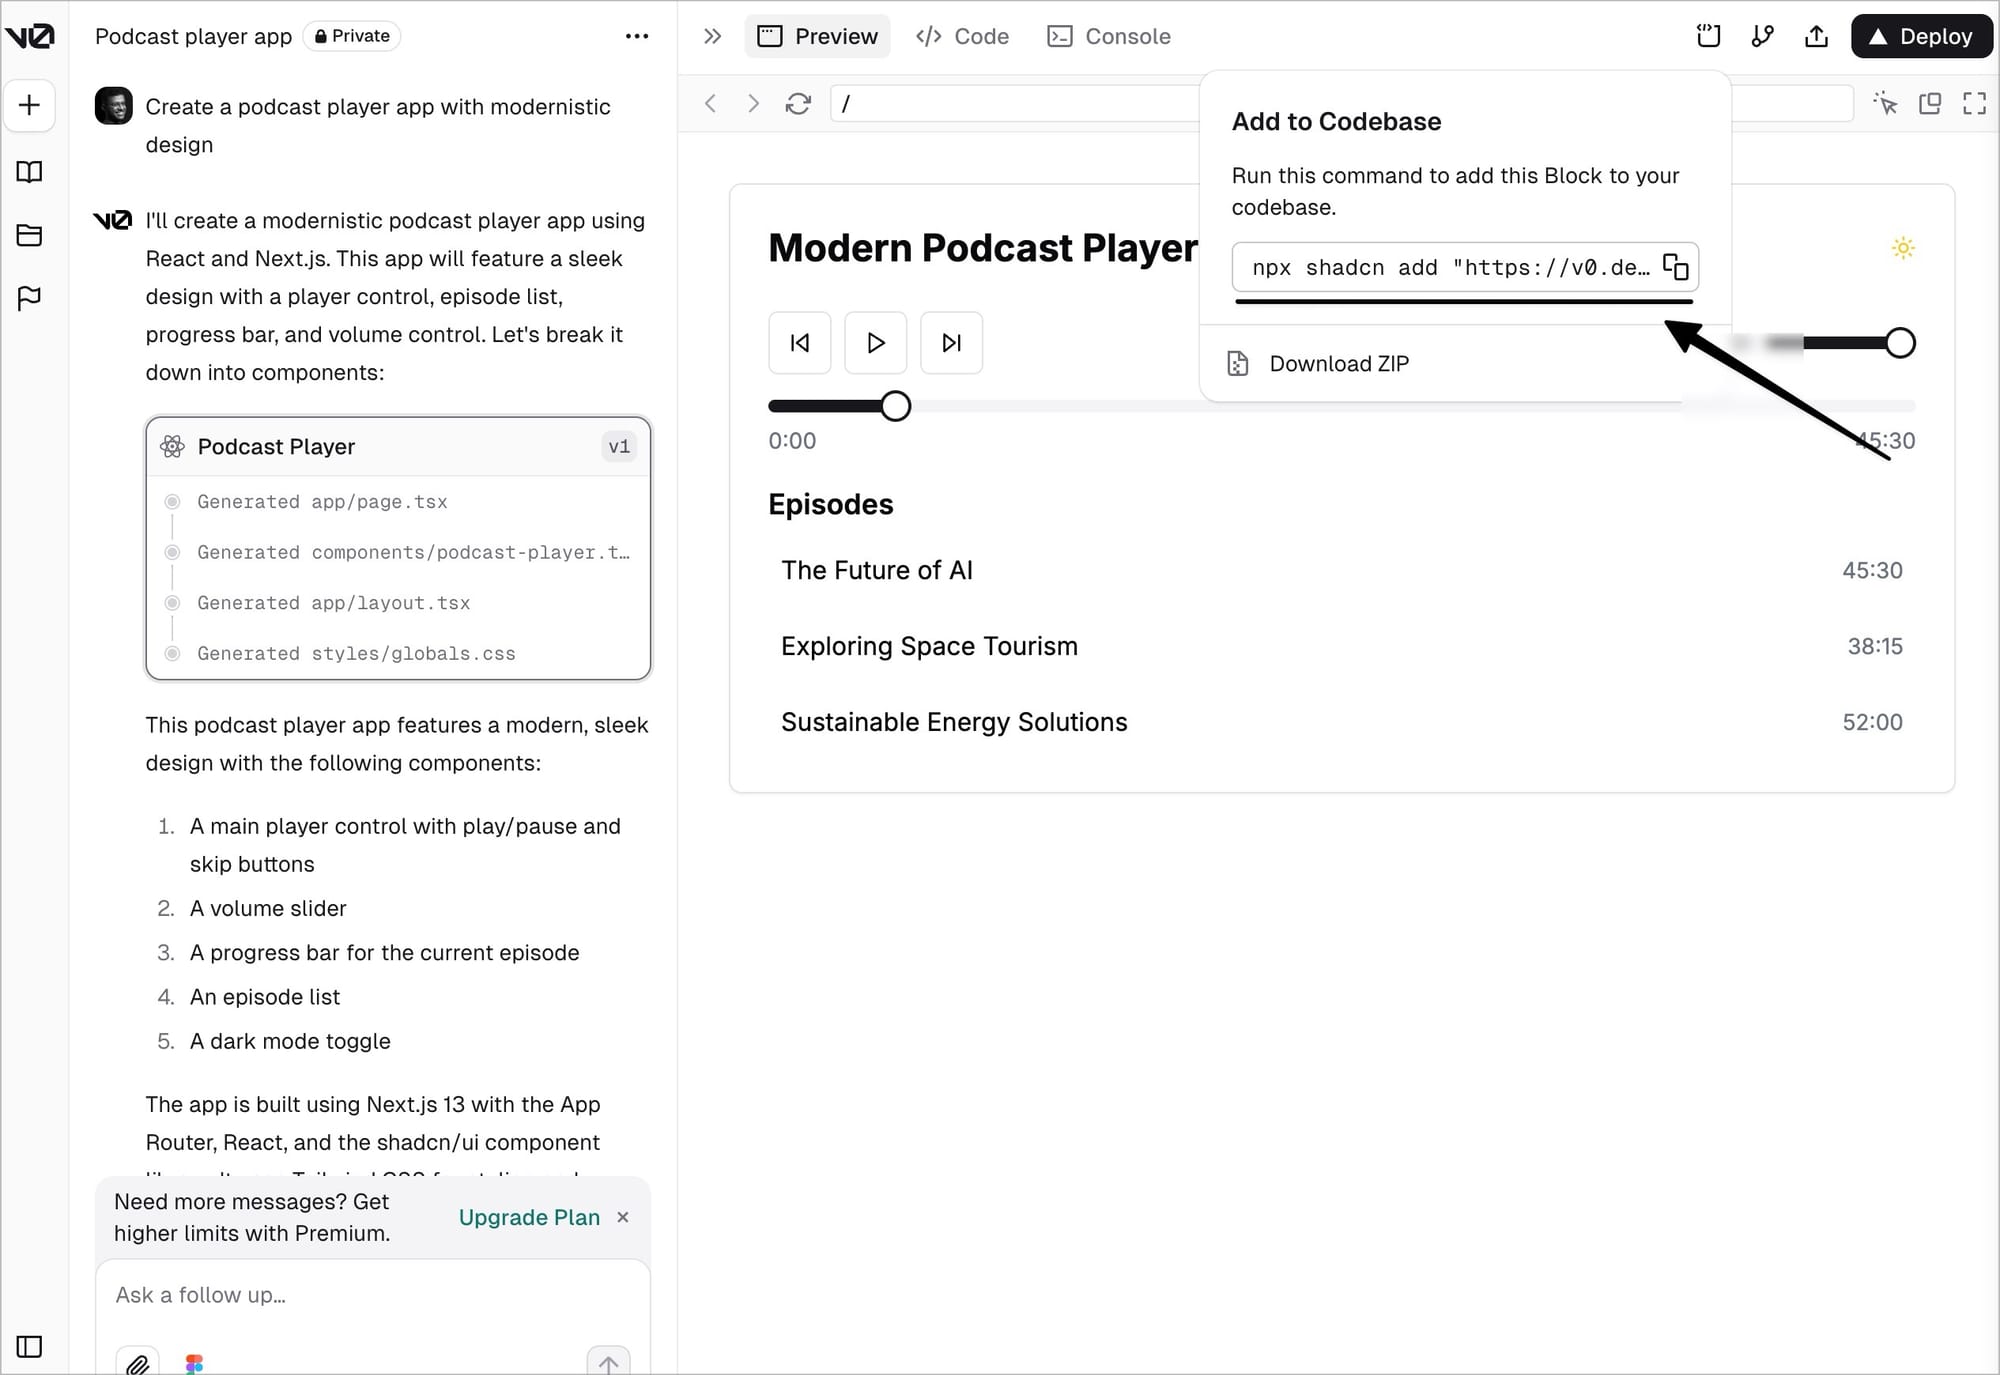
v0.dev also then allows me to integrate the components to the codebase using the command
Integrating Kamal on Hetzner VPS
Now that we had integrated Shadcn + React on our Rails 8 project, it was now time to think about deployment. If you plan to deploy your Inertia Rails application with SSR enabled using Kamal, a few additional tweaks may be required. This guide will walk you through the steps to quickly configure Kamal for deploying your next Inertia Rails application with SSR support.
As a pre-requisite of deployment, it was important root access to a Hetzner VPS server. Integrate the website domain purchased with Cloudflare.
Update the A and AAAA records on Cloudflare using the IPv4 and IPv6 addresses made available on Hetzner. After these steps, set up a Docker Hub account, and keep a note of your DockerHub Access Token, as well as your Docker Hub username.
A (DNS only | auto TTL) [website-name] points to [hetzner-ipv4-address]
A (DNS only | auto TTL) [subdomain.website-name] points to [hetzner-ipv4-address]
A (DNS only | auto TTL) [www.website-name] points to [hetzner-ipv4-address]
AAAA (DNS only | auto TTL) [website-name] points to [hetzner-ipv6-address]
AAAA (DNS only | auto TTL) [subdomain.website-name] points to [hetzner-ipv6-address]
AAAA (DNS only | auto TTL) [www.website-name] points to [hetzner-ipv6-address]
Add your secrets
Add your KAMAL_REGISTRY_PASSWORD from your ENV:
export KAMAL_REGISTRY_PASSWORD=[dockerhub-access-token]Once done, also open Docker Hub on your system, and ensure it’s running. Also login to Docker Hub using your terminal with the docker login to see if the int
Update your Dockerfile
Once you know your Hetzner IP address, website domain name, Docker Hub username, Docker Hub Access Token, you can then move on to update your Dockerfile as follows:
# syntax=docker/dockerfile:1
# check=error=true

ARG RUBY_VERSION=3.3.6
FROM docker.io/library/ruby:$RUBY_VERSION-slim AS base

WORKDIR /rails

RUN apt-get update -qq && \
    apt-get install --no-install-recommends -y curl libjemalloc2 libvips postgresql-client && \
    rm -rf /var/lib/apt/lists /var/cache/apt/archives

ARG NODE_VERSION=22.11.0
ENV PATH=/usr/local/node/bin:$PATH
RUN curl -sL https://github.com/nodenv/node-build/archive/master.tar.gz | tar xz -C /tmp/ && \
    /tmp/node-build-master/bin/node-build "${NODE_VERSION}" /usr/local/node && \
    rm -rf /tmp/node-build-master

ENV RAILS_ENV="production" \
    BUNDLE_DEPLOYMENT="1" \
    BUNDLE_PATH="/usr/local/bundle" \
    BUNDLE_WITHOUT="development"

FROM base AS build

RUN apt-get update -qq && \
    apt-get install --no-install-recommends -y build-essential git libpq-dev node-gyp pkg-config python-is-python3 && \
    rm -rf /var/lib/apt/lists /var/cache/apt/archives

COPY .ruby-version Gemfile Gemfile.lock ./
RUN bundle install && \
    rm -rf ~/.bundle/ "${BUNDLE_PATH}"/ruby/*/cache "${BUNDLE_PATH}"/ruby/*/bundler/gems/*/.git && \
    bundle exec bootsnap precompile --gemfile

COPY package.json package-lock.json ./
RUN npm ci

COPY . .

RUN bundle exec bootsnap precompile app/ lib/

RUN SECRET_KEY_BASE_DUMMY=1 ./bin/rails assets:precompile

RUN rm -rf node_modules

FROM base

COPY --from=build "${BUNDLE_PATH}" "${BUNDLE_PATH}"
COPY --from=build /rails /rails

RUN groupadd --system --gid 1000 rails && \
    useradd rails --uid 1000 --gid 1000 --create-home --shell /bin/bash && \
    chown -R rails:rails db log storage tmp storage
USER 1000:1000

ENTRYPOINT ["/rails/bin/docker-entrypoint"]

EXPOSE 80
CMD ["./bin/thrust", "./bin/rails", "server"]
Setup server role to run SSR server in config/deploy.yml
The Node-based Inertia SSR server is used to pre-render pages on the server before sending them to the client. The vite_ssr role ensures that the SSR server runs separately from the main Rails app server. The Rails app also needs to know where to send SSR requests. Add the VITE_RUBY_HOST environment variable to ensure your Rails application can connect to the correct SSR server. The value VITE_RUBY_HOST: "vite_ssr" must match the network-alias defined in the vite_ssr role above. Update the asset_path to /rails/public/vite.
The deploy.yml can be updated as follows:
service: [app-name]

image: [dockerhub-username]/[app-name]

servers:
  web:
    - [hetzner-ip-address]
  vite_ssr:
    hosts:
      - [hetzner-ip-address]
    cmd: bundle exec vite ssr
    options:
      network-alias: vite_ssr

proxy:
  ssl: true
  host: [app-name].[website-domain]
  app_port: 3000

# Credentials for your image host.
registry:
  username: [dockerhub-username]
  password:
    - KAMAL_REGISTRY_PASSWORD

env:
  secret:
    - RAILS_MASTER_KEY
  clear:
    # SOLID_QUEUE_IN_PUMA: true
    VITE_RUBY_HOST: "vite_ssr"

aliases:
  console: app exec --interactive --reuse "bin/rails console"
  shell: app exec --interactive --reuse "bash"
  logs: app logs -f
  dbc: app exec --interactive --reuse "bin/rails dbconsole"

volumes:
  - "[app-name]_storage:/storage/database.sqlite3"

asset_path: /rails/public/vite

# Configure the image builder.
builder:
  arch: amd64
Deploy
Once everything is set up, you can deploy your application by running:
kamal setup(if you haven’t provisioned the server yet).kamal deploy(to deploy your application).
Read more
- 18 key ideas from reading Henrik Karlsson this monthwriting
- Stop arguing, and start drawing circles togethermathematics
- The whole world is just the snake eating its own tailmental-models
- Life lessons and hot takes from my 30slifestyle
- Building a skill for coherent science illustrationsscience
- My agentic engineering workflow (step by step)agentic-coding
- Hammock driven developmentagentic-coding
- Peculiar ways number three fits into our funny little brainsmental-models
- AI sandwich as a defacto principle for anything agentic engineering relatedagentic-coding
- Authority in the guise of evidencecritical-rationalism
- Map is not the territoryphilosophy
- Self hypnosis as a manifestation ritualmeditation
- Hegelian dialectic for structured reasoning with AI agentsphilosophy
- How I prepare for tough negotiations nowadaysnegotiation
- When should we steelthread somethingproduct-development
- Breadboarding, shaping, slicing, and steelthreading solutions with AI agentsproduct
- Healthy conflict in teams have a tipping pointteam-building
- How I deslopify AI writingwriting
- How I started building softwares with AI agents being non technicalagentic-coding
- Read raw transcriptswriting
- Legible and illegible tasks in organisationsproduct
- L2 Fat marker sketchesdesign
- Writing as moats for humanswriting
- Beauty of second degree probesdecision-making
- Boundary objects as the new prototypesprototyping
- One way door decisionsproduct
- Finished softwares should existproduct
- How I periodically rank my rough draftsobsidian
- Flipping questions on its headinterviewing
- Vibe writing maximswriting
- How I blog with Obsidian, Cloudflare, AstroJS, Githubwriting
- How I build greenfield apps with AI-assisted codingagentic-coding
- We have been scammed by the Gaussian distribution clubmathematics
- Classify incentive problems into stag hunts, and prisoners dilemmasgame-theory
- I was wrong about optimal stoppingmathematics
- Thinking like a shipmental-models
- Hyperpersonalised N=1 learningeducation
- New mediums for humans to complement superintelligenceagentic-coding
- Maxims for AI assisted codingagentic-coding
- Virtual bookshelvesaesthetics
- It's computational and AI everythingagentic-coding
- Public gardens, secret routesdigital-garden
- Git way of learning to codeagentic-coding
- Style Transfer in AI writingagentic-coding
- Understanding codebases without using codeagentic-coding
- Vibe coding with Cursoragentic-coding
- Virtuoso Guide for Personal Memory Systemsmemory
- Writing in Future Pastwriting
- Publish Originally, Syndicate Elsewhereblogging
- Poetic License of Designdesign
- Idea in the shower, testing before breakfastsoftware
- Technology and regulation have a dance of ice and firetechnology
- How I ship "stuff"software
- Writing is thinkingwriting
- Song of Shapes, Words and Pathscreativity
- How do we absorb ideas better?knowledge
- Read writers who operatewriting
- Brew your ideas lazilyideas
- Trees, Branches, Twigs and Leaves — Mental Models for Writingwriting
- Compound Interest of Private Noteswriting
- Conceptual Compression for LLMsagentic-coding
- Meta-analysis for contradictory research findingsdigital-health
- Proof of workproduct
- Gauging previous work of new joinees to the teamleadership
- Task management for product managersproduct
- Beauty of Zettelswriting
- Stitching React and Rails togetheragentic-coding
- Exploring "smart connections" for note takingwriting
- Deploying Home Cooked Apps with Railssoftware
- Repetitive Copypromptingwriting
- Questions to ask every decadejournalling
- Balancing work, time and focusproductivity
- Hyperlinks are like cashew nutswriting
- Brand treatments, Design Systems, Vibesdesign
- How to spot human writing on the internetwriting
- Can a thought be an algorithm?product
- Opportunity Harvestingcareers
- Everything is a prioritisation problemproduct
- How I do product roastsproduct
- The Modern Startup Stacksoftware
- In-person vision transmissionproduct
- How might we help children invent for social good?social-design
- The meeting before the meetingmeetings
- Design that's so bad it's actually gooddesign
- Lessons learnt interview prepping for product rolesinterviewing
- Obsessing over personal websitessoftware
- English is the hot new programming languagesoftware
- Better way to think about conflictsconflict-management
- The role of taste in building productsdesign
- Dear enterprises, we're tired of your subscriptionssoftware
- Products need not be user centereddesign
- World's most ancient public health problemsoftware
- Pluginisation of Modern Softwaredesign
- Let's make every work 'strategic'consulting
- Making Nielsen's heuristics more digestibledesign
- Startups are a fertile ground for risk takingentrepreneurship
- Insights are not just a salad of factsdesign
- Minimum Lovable Productproduct
- Methods are lifejackets not straight jacketsmethodology
- How to arrive at on-brand colours?design
- Minto principle for writing memoswriting
- Importance of Whytask-management
- Quality Ideas Trump Executionsoftware
- Why I prefer indie softwareslifestyle
- Use code only if no code failscode
- Self Marketing
- Personal Observation Techniquesdesign
- Design is a confusing worddesign
- A Primer to Service Design Blueprintsdesign
- Rapid Journey Prototypingdesign
- Visualise detailed file structures on CLIcli
- Do's and Don'ts of User Researchdesign
- Design Manifestodesign
- Complex project management for productproducts
- How might we enable patients and caregivers to overcome preventable health conditions?digital-health
- Pedagogy of the Uncharted — What for, and Where to?education
- Future of Equity with Ludovick Petersinterviewing
- Future of Ageing with Mehdi Yacoubiinterviewing
- Future of Tacit knowledge with Celeste Volpiinterviewing
- Future of Mental Health with Kavya Raointerviewing
- Future of unschooling with Che Vanniinterviewing
- Future of Rural Innovation with Thabiso Blak Mashabainterviewing
- Future of work with Laetitia Vitaudinterviewing
- How might we prevent acquired infections in hospitals?digital-health
- The why to endure any howentrepreneurship
- Design education amidst social tribulationsdesign
- How might we assist deafblind runners to navigate?social-design